テキスト入力
テキスト入力
今回はテキスト入力について解説していきます。
Flutterでのテキスト入力の方法と操作にはいくつかの方法があります。実際に利用する要件に合わせて使い分けてください。
TextField
「TextField」は文字列を入力するためのシンプルな入力フォームとなります。
class MyApp extends StatelessWidget {
  @override
  Widget build(BuildContext context) {
    return MaterialApp(
      title: 'Form',
      home: Scaffold(
        appBar: AppBar(
          title: Text('Form'),
        ),
        body: Center(
          child: ChangeForm(),
        ),
      ),
    );
  }
}

class ChangeForm extends StatefulWidget {
  @override
  _ChangeFormState createState() => _ChangeFormState();
}

class _ChangeFormState extends State<ChangeForm> {

  String _text = '';

  void _handleText(String e) {
    setState(() {
      _text = e;
    });
  }

  Widget build(BuildContext context) {
    return Container(
        padding: const EdgeInsets.all(50.0),
        child: Column(
          children: <Widget>[
            Text(
              "$_text",
              style: TextStyle(
                  color: Colors.blueAccent,
                  fontSize: 30.0,
                  fontWeight: FontWeight.w500
              ),
            ),
            new TextField(
              enabled: true,
              // 入力数
              maxLength: 10,
              maxLengthEnforced: false,
              style: TextStyle(color: Colors.red),
              obscureText: false,
              maxLines:1 ,
              //パスワード
              onChanged: _handleText,
            ),
          ],
        )
    );
  }
}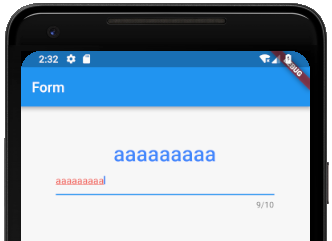
enabledは活性、非活性の切り替えに利用します。maxLenthは入力可能な文字数です。maxLengthEnforcedは入力可能な文字数の制限を超える場合の挙動を制御します。falseにしておくと最大文字数を超えても入力することが可能ですが、見た目はエラー状態となります。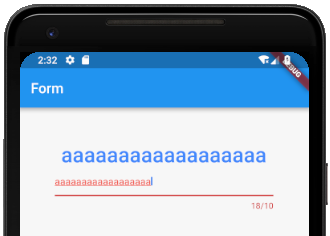
obscureTextをtrueにするとこのように、パスワード入力のように入力している値をマスクしてくれます。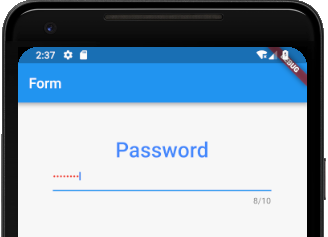
maxLinesは入力できる行数の最大行数を設定できます。これによりHTMLで言う所のテキストエリア表示が可能です。decorationを追加することで、表示を整形することも可能です。
new TextField(
  enabled: true,
  // 入力数
  maxLength: 10,
  maxLengthEnforced: false,
  style: TextStyle(color: Colors.black),
  obscureText: false,
  maxLines:1 ,
  decoration: const InputDecoration(
    icon: Icon(Icons.face),
    hintText: 'お名前を教えてください',
    labelText: '名前 *',
  ),
  //パスワード
  onChanged: _handleText,
),
inputFormattersを利用すると、入力値に対するフォーマットを行うことが可能です。
フォーマッターは「TextInputFormatter」を継承して自作もできますし、以下のような元から存在するフォーマッターを利用することもできます。- WhitelistingTextInputFormatter
- BlacklistingTextInputFormatter
WhitelistingTextInputFormatter
「WhitelistingTextInputFormatter」または「BlacklistingTextInputFormatter」を使う場合は以下のimportが必要です。
import 'package:flutter/services.dart';new TextField(
enabled: true,
// 入力数
maxLength: 10,
maxLengthEnforced: false,
style: TextStyle(color: Colors.black),
obscureText: false,
maxLines:1 ,
inputFormatters: <TextInputFormatter> [
WhitelistingTextInputFormatter.digitsOnly,
],
decoration: const InputDecoration(
icon: Icon(Icons.face),
hintText: '年齢を入力してください',
labelText: '年齢 *',
),
//パスワード
onChanged: _handleText,
),
このように、WhitelistingTextInputFormatterは入力可能な文字を制限することが可能で、デフォルトでdigitsOnlyが用意されています。
他にも制御をしたい場合は以下のように正規表現を渡すことによって独自に文字列を制限することが可能です。
WhitelistingTextInputFormatter(RegExp(r'\d+'))BlacklistingTextInputFormatter
また同じ要領でBlacklistingTextInputFormatterを使うことで入力を制限することも可能です。
デフォルトでsingleLineFormatterが用意されています。
独自に実装したい場合は、以下のように実装することで、独自に文字列を制限することが可能です。
BlacklistingTextInputFormatter(RegExp(r'\n'))BlacklistingTextInputFormatterは、リストに該当する文字列があった場合に、文字列を置換することも可能です。
その場合は、以下のように第2引数に置換後の文字列を渡してください。
BlacklistingTextInputFormatter(RegExp(r'[0-9]'), replacementString:'-')TextEditingController
「TextEditingController」はテキスト入力を制御するのに利用します。
「TextField」や、「TextFormField」に対して「TextEditingController」を使って、複雑な制御を行うことができます。
「TextField」の制御を「TextEditingController」を利用して行います。
class _ChangeFormState extends State<ChangeForm> {

  final TextEditingController _textEditingController = new TextEditingController();

  String _text = '';

  @override
    void initState() {
      super.initState();
      _textEditingController.addListener(_printLatestValue);
  }
  @override
  void dispose() {
    _textEditingController.dispose();
    super.dispose();
  }

  void _handleText(String e) {
    setState(() {
      _text = e;
    });
  }
  void _printLatestValue() {
    print("入力状況: ${_textEditingController.text}");
  }

  Widget build(BuildContext context) {
    return Container(
        padding: const EdgeInsets.all(50.0),
        child: Column(
          children: <Widget>[
            Text(
              "$_text",
              style: TextStyle(
                  color:Colors.blueAccent,
                  fontSize: 30.0,
                  fontWeight: FontWeight.w500
              ),
            ),
            new TextField(
              enabled: true,
              maxLength: 10,
              maxLengthEnforced: false,
              obscureText: false,
              controller: _textEditingController,
              onChanged: _handleText,
              onSubmitted: _submission,
            )
          ],
        )
    );
  }
  void _submission(String e) {
    print(_textEditingController.text);
    _textEditingController.clear();
    setState(() {
      _text = '';
    });
  }
}
このように「TextEditingController」を使うことで、保存後に「TextField」の中身をクリアすることも可能です。
initState()メソッドでaddListenerを設定し、処理を追加することで入力途中での文言をプリントしています。
このようにリスナー登録することで複雑な制御が可能です。
@override
void initState() {
  super.initState();
  _textEditingController.addListener(_printLatestValue);
}
_printLatestValue() {
  print("入力状況: ${_textEditingController.text}");
}
「_ChangeFormState」クラスが破棄されるタイミングで確実にリソースが破棄されるように以下を記載しておきましょう。
@override
void dispose() {
  _textEditingController.dispose();
  super.dispose();
}
TextFormField
「TextFormField」はフォーム入力で必要な色々な機能を提供してくれます。
class _ChangeFormState extends State<ChangeForm> {

  final _formKey = GlobalKey<FormState>();

  String _name = '';
  String _email = '';

  Widget build(BuildContext context) {
    return Form(
      key: _formKey,
      child: Container(
        padding: const EdgeInsets.all(50.0),
        child: Column(
          children: <Widget>[
            new TextFormField(
              enabled: true,
              maxLength: 20,
              maxLengthEnforced: false,
              obscureText: false,
              autovalidate: false,
              decoration: const InputDecoration(
                hintText: 'お名前を教えてください',
                labelText: '名前 *',
              ),
              validator: (String value) {
                return value.isEmpty ? '必須入力です' : null;
              },
              onSaved: (String value) {
                this._name = value;
              },
            ),
            new TextFormField(
              maxLength: 100,
              autovalidate: true,
              decoration: const InputDecoration(
                hintText: '連絡先を教えてください。',
                labelText: 'メールアドレス *',
              ),
              validator: (String value) {
                return !value.contains('@') ? 'アットマーク「@」がありません。' : null;
              },
              onSaved: (String value) {
                this._email = value;
              },
            ),
            RaisedButton(
              onPressed: _submission,
              child: Text('保存'),
            )
          ],
        )
      )
    );
  }
  void _submission() {
    if (this._formKey.currentState.validate()) {
      this._formKey.currentState.save();
      Scaffold
          .of(context)
          .showSnackBar(SnackBar(content: Text('Processing Data')));
      print(this._name);
      print(this._email);
    }
  }
}
- 「TextFormField」では、
validatorが利用可能です。validator()メソッドに実装を書くことで入力チェックを可能にしています。 autovalidateを設定すると文字列入力と同時にvalidator()メソッドが呼ばれるようになります。
これには少し欠点があり、初回表示時にもチェックがかかっているので、表示時点で項目がエラー表示されてしまうので注意が必要です。 falseの場合にどのタイミングでvalidator()メソッドが実行されるのかについては後述します。onSaved()メソッドは、処理全体が保存されるタイミングで呼び出されます。- 「Form」クラスと「GlobalKey」クラスを使うことで、フォームをユニークなグループにします。
今回以下のように保存処理を実行しています。
void _submission() {
  if (this._formKey.currentState.validate()) {
    this._formKey.currentState.save();
    Scaffold
        .of(context)
        .showSnackBar(SnackBar(content: Text('Processing Data')));
    print(this._name);
    print(this._email);
  }
}以下が実行されることで、_formKeyのフォームに登録されているすべてのvalidator()が実行されその結果を返します。
this._formKey.currentState.validate()以下を実行されることで、_formKeyのフォームに登録されているすべてのsave()が実行されます。
this._formKey.currentState.save();参考
TextField
TextEditingController
TextFormField
Cookbook
validation
TextInputFormatter
Form